
Setting Up Scan to Order
- Login to CMS to enable this feature
- Go to Store Module > Scan to Order tab
- Click + Add new table to begin setup
Add table group
Group tables by floor, area (e.g., indoor, outdoor), or type (e.g., regular, premium)
Fill in:
- Table Name
- Description
- Branch & Area
- Number of Tables
Customize QR Codes
Match QR designs to your branding:
- Header – Store name
- Footer – Quick instructions
- Colors – Adjust QR, background, and text (use black or white for best contrast)
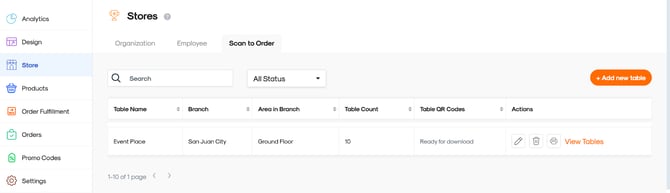
Manage Tables and QR Codes
From the Scan to Order module, view:
- Table details such as ID, name, availability, and QR codes
- Actions include: Edit, Delete, Print QR codes (bulk or per table)
Set Service Fees (Optional)
- Go to Order Fulfillment Module > Fees Tab
- Scroll to Scan to Order Fee and toggle ON
How to Manage Scan to Order
Using CMS:
- Login to CMS
- Go to Orders Module > Scan to Order tab
- View customer orders, statuses, and details
- Click Eye icon for full dine-in order info
For special discount tracking: Use the MMA app
Using MMA:
- Log in to MMA
- On Home tab, tap Quick Actions:
- Scan to Order – manage orders
- Tables – see occupied/vacant/disabled tables
- Manage Tables
- Tap on a table to update status or visibility
- Manage Orders
- View statuses
- New - new orders will appear here
- Preparing - order is being prepared
- Served - order is finished and served
- Cancelled - order is cancelled due to merchant’s reason
- Tap View Details to update order status
-
- Go to More tab > Scan to Order
Tap View for full order/payment info
- Go to More tab > Scan to Order
Managing Special Discounts
Orders with SC/PWD tags are marked
- Tap order > Approve/Decline or Select items for discount > Apply Discount
- Note: Tap Undo immediately if you make a mistake
- Note: Tap Undo immediately if you make a mistake
CUSTOMER JOURNEY:
Place an Order:
- Scan the table’s QR code
- Tap View Menu, browse, and Add to Order
- Tap Review Order > Place Order
- Orders go directly to your kitchen via CMS or MMA
- To order more, tap Order More and repeat.
Bill Out & Pay
- Tap Bill Out
- Choose payment method
- Show Payment Confirmation to staff
Avail SC/PWD Discount
- Tap Menu icon > SC/PWD ID
- Tap + Register new ID, upload front/back photos
- Tap Apply – merchant will verify
Or during Bill Out:
- Tap Apply Senior Citizen / PWD ID
- Fill in details and upload ID
- Once verified, discount is applied automatically