- Through Products Module
Go to Products Module > Inventory Tab to view all your added products. Here, you can make branch-specific updates for the following:
-
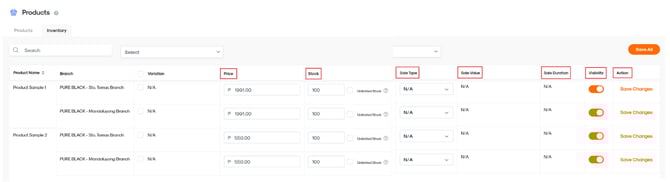
Regular Price
By default, the regular price set during the product upload applies to all brands. You may then set varying prices for certain branches here.
-
Stock Quantity
Make sure that the Stock Quantity is turned on for the branch and product you are updating before you place specific quantities. If you have unlimited stock for a certain product, you can tick the checkbox.
-
Sale Items
To mark an item on sale, select the dropdown menu under Sale Type. Select the discount type (percentage or Peso value) from the dropdown menu and input the values. Then, set the duration of the sale period.
-
Product Visibility
By default, all products tagged to a brand will be visible across all its branches. To hide certain products from your branch, you may toggle them off here.
Once all branch-specific changes are made, on the right-hand side, select Save Changes or Save All if you will update multiple products at once. Repeat the same process for products per branch if necessary.
2. Through the Locations module
Tagging and Untagging Products Per Brand
You can also manage which products appear under each brand using the Locations Module.
Tagging Products
- Go to the Locations Module to view all brands and branches.
- Click + Tag Products to display the product list.
- Select the products you want to tag under the brand.
- Click the arrow button to move the selected items under Tagged Products.
- Click Save Changes.
Untagging Products
- Go to the Locations Module to view all brands and branches.
- Click + Tag Products to display the product list.
- Select the products you want to untag.
- Click Remove Selected or Remove All to untag products from the brand.
- Click Save Changes.